
Leeds Association member John Kelsall has written an interesting and amusing report about producing ‘Miniature Schneider Trophies‘. It was originally sent to members of the committee of the Royal Aero Club of which John is a member. He sent a copy to our President, Barrie Yates, and with John’s permission we publish it here for your enjoyment….
Miniature Schneider Trophies
Dear members of the committee,
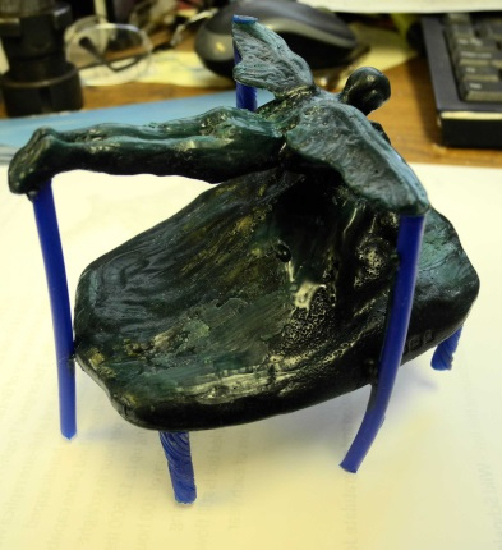
As you are aware I have been working now for almost a year on finding an alternative source of Miniature Schneider Trophies. I approached three manufacturing jewellers two of who were not interested and the third wanted £1000 each for them. At this point I thought to myself that “it can’t be that difficult”. Just shows how wrong one can be, so me being me I decided to explore the internet to find out how to exactly to make a silver replica using the “Lost Wax” or “Investment Casting” method. So, the basic process, if you are interested is that one produces a wax replica of the desired article by first producing a silicone resin mould which I did by setting my own replica into a Perspex box and pouring liquid silicone around it. When the silicone had set I was able to carefully cut the mould open using a scalpel to remove the replica from within. I now had a mould into which I would have to pour molten wax and when it had cooled and hardened I could, after several attempts, carefully remove the wax model from it without breaking the wings off! A couple of hours work was required with various shaped tools and more scalpels and I had a wax model complete with risers (wax rods attached to the model in strategic places) to allow the air trapped within the mould cavity to escape when the molten silver is poured in.
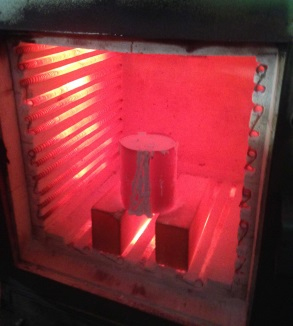
The next part of the process is to cast a plaster of Paris mould by placing the wax model upside down into a suitably sized steel receptacle and pouring plaster of Paris up to the top of the risers. Once set the process could continue. The mould is placed upside down again in an oven of some sort and heated so that the wax model melts away and leaves a cavity in the plaster into which molten metal can be poured. I didn’t have an oven at work so I took the plaster mould home and sat it in the oven in our kitchen. I gave it gas mark 5 or 190 degrees C for a couple of hours. I retired to the settee to watch some TV and was surprised just how quickly the wax would melt and come to its own personal boiling point whereupon it smokes furiously and filled the house with the smell you get when you have just blown out the candles on your birthday cake. Needless to say I was banned from the house with my “hair brained” Schemes and I had to find a “proper” Kiln. The next step in the process following melting out the wax is to pour molten metal into the mould. I had been lucky enough to borrow a small electric crucible which my partner had used to melt scrap precious metals into ingots. Silver was procured by purchasing scrap silver candlesticks, spoons and the like on eBay. I was careful to limit my bids to the cost per gram at the going bullion rate for scrap less any postage based upon the weight of the item. I knew that my own replica weighed approximately 400g so I purchased about half a kilo at around £250. Now the moment of truth, I switched on the crucible to melt the scrap silver and sat the mould squarely on my bench and. Nothing happened! I investigated and found that the temperature controller was faulty on the crucible and needed replacement, a few days later and the crucible was working. Silver melts at around 690 degrees C which is quite a bright yellow when molten and I must say a little daunting to handle. Protective gloves and a face mask are the order of the day. The moment of truth came and I took the special tongs and carefully lifted the carbon melting pot from the crucible and began to pour the molten silver into the mould. After a few seconds of pouring something akin to the first moments of Krakatoa seemed to be happening. First smoke and then bubbling, gentle at first then increasingly more violent. I stood back and watched what can only be described as a slightly smaller version of what happened at Pompeii and I don’t mean Portsmouth! I survived and gathered up the pieces of silver which had erupted from the mould due to the burning of the residue of the wax which was left in there. Needless to say more research was needed to find out what I had done wrong. As it turned out I should have “burned out the wax” for four hours at 600 degrees C to remove any residue of wax from the mould, what I needed was a bigger Kiln! I trawled the internet and was disappointed to find that what I needed, a pottery Kiln, was typically priced around £400. At this point I was about to give up when I came across a Kiln on a farm in Stevenage which was described as for “spares or repair” I made a bid of £20 and bought it for £17! Now I had to collect it from Stevenage. I persuaded our van driver that he would like a drive down the A1 and off he went. He struggled to find the place and between him and the farmer they got it into the van and he made his way back up the A1 to Worksop.
When it arrived I was pleasantly surprised to find it mostly complete but not working. I enlisted the help of an electrician who works for us from time to time and after a couple of days we threw the switch, warmth! Then Heat! It was working, now I could really move on. Back to the process of making the wax and casting and encasing it in plaster. Slowly my productions improved but I could not persuade the mould to fill fully and holes were always evident in the castings. I followed many blind alleys and eventually came to the conclusion that I should perhaps try another metal. So, back to the internet.

I discovered that there is a metal very similar to pewter but with no lead called Britannia Metal. I could buy Britannia metal at around a fifth of the cost of silver. The melting point was 375 degrees and best of all I could buy a high temperature silicone resin which I could pour the Britannia metal directly into. Result! Well perhaps not yet, the main factor in using this metal was that I could make castings and if they were unsatisfactory re-melt the faulty casting and cast another one again within 20 minutes.
I had an exciting moment during this process as because I could melt it at a lower temperature than silver I could employ a large metal ladle and a gas and air torch. I placed the ladle on the hearth in my workshop and proceeded to heat about 1 and a half Kgs of metal. It quickly became molten and I prepared for a pour. I had been working during the day on a project we have to build a magnetic conveyor for carrying tin lids from one machine to another and unbeknown to me I had a fairly powerful magnet in my coat pocket. I turned off the blow-torch and bent down to place it back on the hook by the hearth and the magnet being a magnet sought out the nearest piece of steel and made a bee-line for it! The metal it found was the handle of the ladle. It promptly pulled the ladle now containing a smoking pool of molten metal off the hearth and I watched in what appeared to be slow motion the whole one and a half kilos pour on to the floor in front of me. My natural reaction was to leap in the air with the style Dick Fosbury would have been proud of, my feet left the ground just in time for me to see the column of hot metal hit the ground and spread out beneath me thankfully missing me completely! Kelsall’s Luck exhibiting itself again. I waited for the metal splashes to cool and swept them up to be re-melted. Close escape number two. I went through fifty or sixty pourings and after much more research made a satisfactory casting. The mould was by now becoming a little tired and I chose to pour another resin mould. Now after cutting many air escape slots and dusting the mould with talc prior to casting I could produce quite a nice replica.
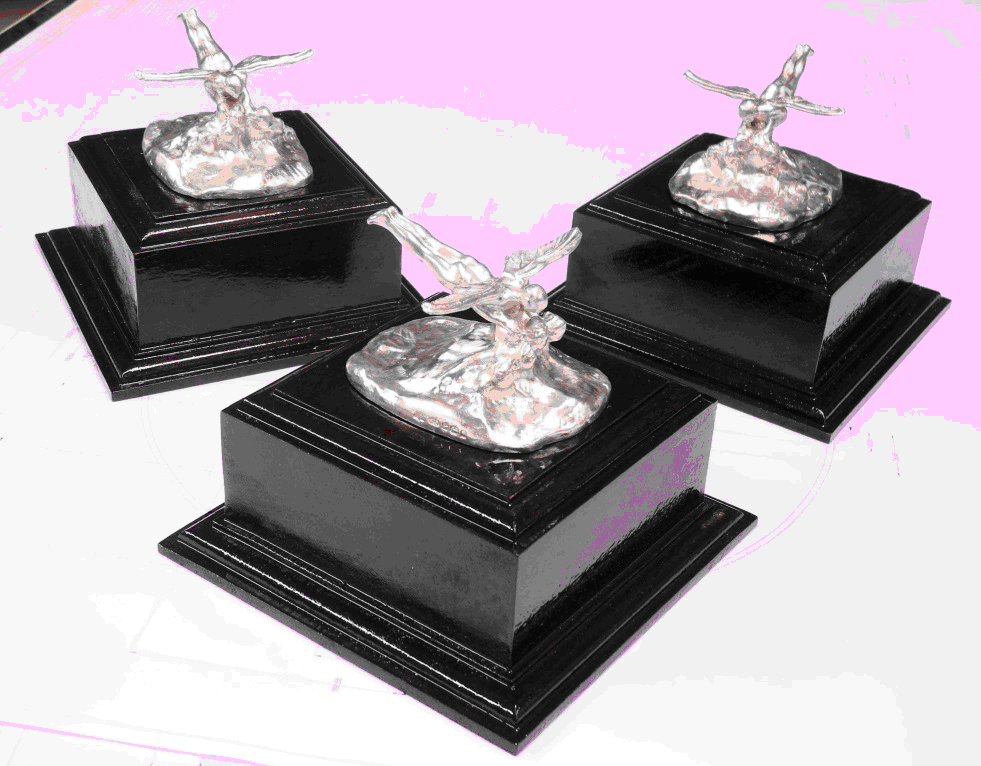
When you spend your life working in steel wood working becomes quite straight forward and after going back to that shop for all seasons (and things) EBay, I bought a suitable lump of timber for the plinths. The manufacture of the plinths was quite straight forward after I made a bespoke cutter to achieve the shape on the shoulders of the block and following much sanding, staining and varnishing I had good Plinths. A fair degree of finishing is needed to the castings but I am sure you will be as pleased as I am with the result. So there you have it I can’t say I haven’t enjoyed chasing this particular fairy I have learnt quite a lot along the way. I have produced three successful trophies and I hope you will be satisfied with the results. I would suggest that I would like to charge £250 each for them which just about covers the cost of the materials I have used along the way, not of course including the silver which I still have and the potters kiln which I may use if more are required in the future.
Your thoughts and comments are, as always welcome.
John Kelsall